
Digitally Sign a Microsoft Word Document for Submission to OFR
![]()
![]()
| Version Number | Date | Change Description |
|---|---|---|
| 1.2 | 06/03/2025 | Combined Digitally Sign a Word Document and Digitally Sign a Register Register Notice Playbooks. |
| 1.1 | 08/17/2022 | Update remove P7M and PKCS7 Signing Tool references. |
| 1.0 | 01/05/2018 | Initial Draft. |
OFR Submission Digital Signatures
If you are using this guide for submitting digitally signed documents to the Office of the Federal Register (OFR) please see the sections on adding an invisible signature or adding multiple invisible signatures below.
Critical Software Configurations
Before you begin digitally signing documents, please ask your Technical Support team to verify the digital signature settings on your computer by following the steps in the Verify Digital Signature Settings section below. This will ensure you are using appropriate cryptographic functions to maintain document integrity with digital signatures.
This guide will outline the benefits of digital signatures and will walk you through the various options and the specific steps for digitally signing a document in Microsoft Word using a PIV credential, delegated digital signature certificate, or another PKI-based digital signature certificate.
Signatory Authorities and PKI Certificates
See the Delegated Digital Signature Playbook for guidance on how to implement a capability for delegating the authority of a senior official to sign OFR documents and obtain associated PKI hardware credentials.
The Office of the Federal Register (OFR) requires that document submissions be digitally signed (using the invisible signature capability) and submitted in Word (.docx) format. Instructions regarding individual signatures can be used for documents and proposed rules being submitted by one agency; however, multiple signatures may be needed for multi-agency submissions to OFR.
For OFR submissions, the digital signatory of a document MUST be the same person whose name is typed in the signature block within the document itself. The names must match exactly or meet the accepted standards listed in the OFR Document Drafting Handbook, Chapter 1.
Introduction
Digital signatures provide cryptographic mechanisms for recipients of a signed document to verify that the contents of the document have not been modified. Additionally, they can also provide proof of origin (traced back to individual signatories) and a basis for intent to apply a signature (legal binding).
All of these benefits can be leveraged by applying high assurance PIV credential capabilities in support of Federal digital signature use cases as applied to Word documents.
There are many options and use cases for digital signatures on Word documents throughout the Federal landscape, as a result, this playbook is organized into several sections:
- Individual Signatures
- Add a Visible Signature Line with Digital Signature
- Add an Invisible Digital Signature
- Multiple Signatures
- Add Multiple Visible Signature Lines with Digital Signatures
- Add Multiple Invisible Digital Signatures
- View Digital Signatures
- Remove Digital Signatures
- OFR Submission FAQs
Software Version Compatibility
There may be some minor differences between various versions of Microsoft Office as it relates to applying or viewing digital signatures; however, all versions starting with Office 2007 have a standardized ability to add an invisible digital signature to Word, Excel and PowerPoint files. Versions prior to Office 2007 that do not leverage XML based file formats (e.g., older .doc vs newer .docx formats) will present unique challenges verifying digital signatures when opened with more modern versions. Newer versions of Microsoft Office, including Office 365, include the capability for inserting visible signature blocks in Word and Excel files that also result in legitimate cryptographic digital signatures, which are verified in the same manner as invisible digital signatures.
Mac Compatibility Issue
Please note that if you are using Microsoft Office for Mac, you may not have any options for applying a digital signature. You may need to leverage Office 365, if available, to digitally sign Office documents.
General Tips for Working with Digitally Signed Files
Document Version Control
Do NOT open a document for digital signature directly from an email. Save the document to your computer first. Then, use the document file saved on your computer for signing purposes.
Microsoft saves Office files upon application of a digital signature, to include subsequent digital signatures in the event there are several in one document. As a result, it is important to take document file version control into consideration when digitally signing. It is recommended to save the document under a new file name prior to signature, to distinguish signed versions from editable versions. Additionally, if files are being sent to signers via email it is important that the signers should save the file locally before applying their signature.
Individual Signatures
The following sections outline the instructions to add one digital signature to Word documents.
Multiple Signatory Authorities
Some use cases may require multiple signatures in support of document approvals, please see the Multiple Signatures section for further instructions on those scenarios where several signers are required for one document.
Add a Visible Digital Signature
Some organizations or use cases may require a visible signature block in their documents, naming the approval authority for the specific document using a signature line. Word does support the insertion of a visible signature block that contains several details about the intended signer.
Who Actually Signed This Document?
Visible signatures can be modified by the document author to assert any name, title and email address and may not be reflective of the actual person who applies their corresponding digital signature. As a result, verifiers of digital signatures should be very careful to view the signing certificate information to ensure it is consistent with the named entity in the visible signature line.
Invisible Signatures for OFR Submission
If you are signing a document for submission to OFR, DO NOT use the visible Insert Signature function (under the INSERT tab in the Word ribbon). Follow the Add an Invisible Signature instructions below to sign the document as this is the format OFR will accept.
- To add a digital signature, open your Microsoft Word document and in the body of the document, click where you’d like to add your signature line.
-
From the Word ribbon selection menu, select the Insert tab and then click Signature Line in the Text group. If the document has not yet been saved, you will be prompted to save the document before continuing to apply the digital signature.

-
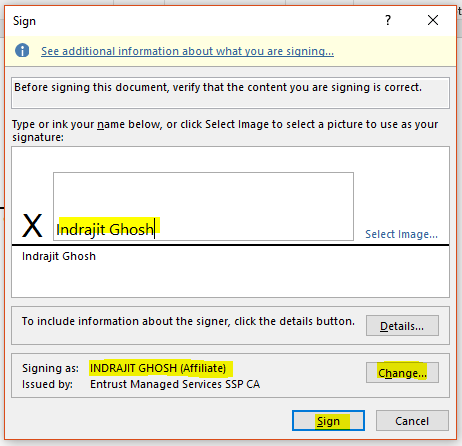
A Signature Setup pop-up box will appear. Enter your information in the text fields, optionally select if you would like to allow the signer to add comments and click OK.
-
Once the visible signature block is inserted, In order to sign the document, double-click the signature line.

-
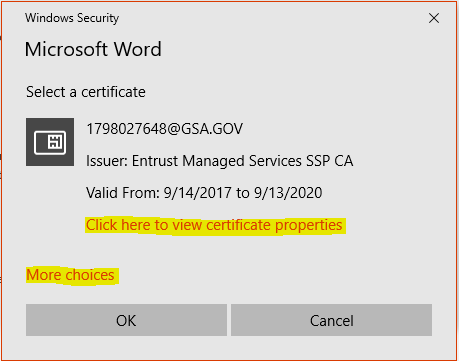
A Sign pop-up box appears. At the X, type your name, sign using the mouse or another pointing device, or select an image file of your signature. Next, look at the ‘Signing as:’ field and verify the selected signing certificate is appropriate. If it is not the correct certificate, click the ‘Change’ button.
-
Select the Click here to view certificate properties, to view the selected certificate information.
-
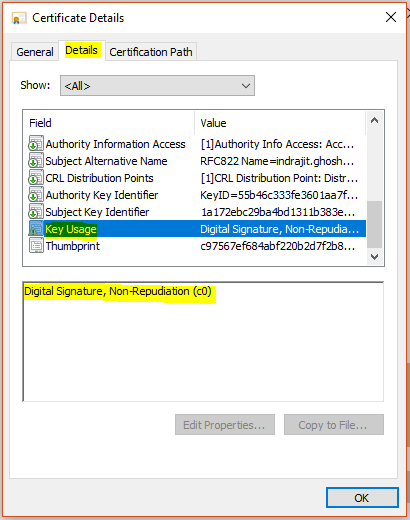
The Certificate Details box appears. Go to the Details tab and scroll down to Key Usage. Single-click on it. The lower text box should now display Digital Signature, Non-Repudiation. If it does, then this is the correct certificate. Click OK.
-
If this is the wrong certificate, and does not assert a key usage of “Non-Repudiation,” click OK. Then click More Choices to see other certificates. Select another certificate and repeat these steps until you find the correct certificate.

-
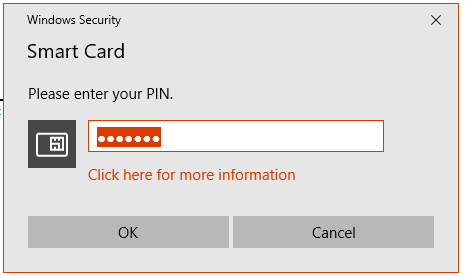
Once the appropriate certificate is selected, click the Sign button to sign the document. Insert your PIV card into the card reader. Enter your smart card (PIV) PIN and click OK.
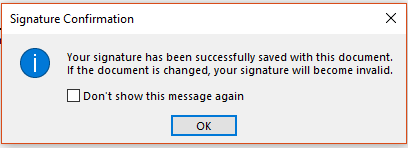
- The Signature Confirmation box tells you that Word saved your digital signature. Click OK.

Editing After Signature
Once you’ve digitally signed your document, if you subsequently edit it, Word will remove the digital signature. Don’t worry, you can always go back to Step 1 and re-apply your digital signature.
Add an Invisible Digital Signature
You can add an invisible digital signature to prevent a signer’s name from appearing in the body of a document. Invisible signatures are the approved digital signature method for submissions to the OFR.
- Open your document and click the File tab.
-
Click Info and then click Protect Document.
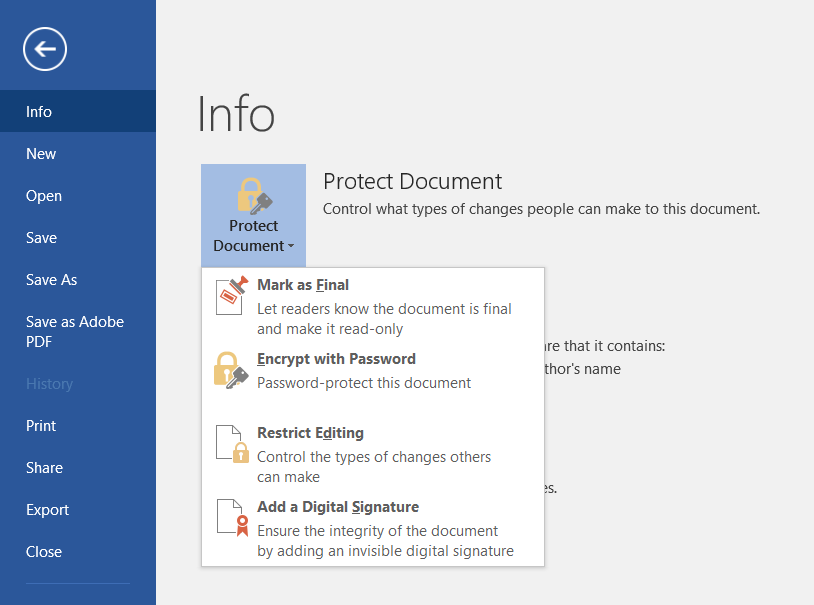
- From the Protect Document drop-down menu, click Add a Digital Signature.
-
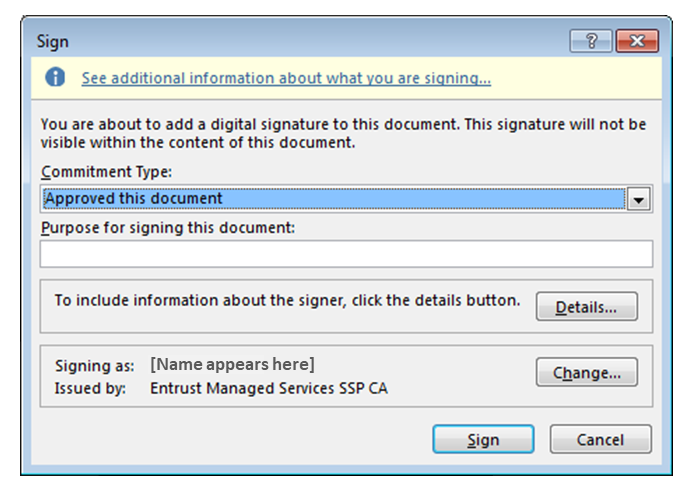
Select a Commitment Type, such as ‘created and approved this document,’ verify the appropriate signing certificate is identified in the ‘Signing as’ field (if it is not the correct certificate, see steps 5-8 of adding a visible signature), and then click Sign.
-
Insert your PIV card into the card reader. Enter your smart card (PIV) PIN and click OK.
- The Signature Confirmation box tells you that Word saved your digital signature. Click OK.
Add Multiple Visible Digital Signatures
Once you digitally sign a document, you can have others also digitally sign it. (Note: If you are the first approver, you should create the visible signature lines for all of the approvers. Then send the document to the second approver.)
-
If you are the second (or other) approver, open the document you’ve received. Double-click your signature line to sign. Follow Steps 4 through 10 from Add a Digital Signature Using a Signature Line.
-
A Signature Setup pop-up box appears. Enter your information in the text fields and click OK.

-
Double-click your signature line.

-
A Sign pop-up box appears. At the X, type your name, sign using the mouse or another pointing device, or select an image file of your signature.
-
Next, look at the ‘Signing as:’ field. You should see your name and certificate information. If you don’t, click the ‘Change’ button to select a different certificate and click Sign
-
Insert your PIV card and enter your smart card (PIV) PIN. Click OK.
-
The Signature Confirmation box tells you that Word saved your digital signature. Click OK.
-
Send the digitally signed document to the next approver.
Each successive approver will be able to open the document and double-click the Signature Line with his/her name and complete the signing process.
Add Multiple Invisible Digital Signatures
Multiple approvers may digitally sign a Word document. This signature process uses the same procedures as you would to add one invisible digital signature: Add an Invisible Digital Signature; however, the completed document must be coordinated with multiple signing parties who chronologically apply their individual digital signature.
If multiple agencies are submitting a document for Federal Register publication, OFR receives only one document, signed by all agency authorized representatives. For example, if six agencies are jointly issuing a rule, OFR does NOT get six submissions of the same rule. Regardless of the method of submission, the legal signatory requirements are the same.
OFR Rules for Multiple Signatories
If you are submitting a document to OFR that requires multiple signatures, be sure to include all required signature blocks in the body of the document before any signatures are applied, otherwise the document will need to be edited which will remove all signatures up to that point.
The final approver will see multiple “invisible” signatures in the document.
Coordinating Multiple Signatures
For multiple-signatory documents (e.g., dual-agency submissions) being submitted to the OFR, the first signer forwards the signed document to the next signer, who repeats the signing process on the already-signed file. All digital signatories must have their names and titles incorporated into a separate signature block in the signature area of the document body before the signing coordination process begins.
It is highly recommended that a signature coordiantion representative be appointed to assist in the file control and communication between each signer.
View Digital Signatures
Word Version Compatibility Issues
If you use Word 2013 or newer, and open a digitally signed Word 2007 or 2010 document, you may have compatibility issues.
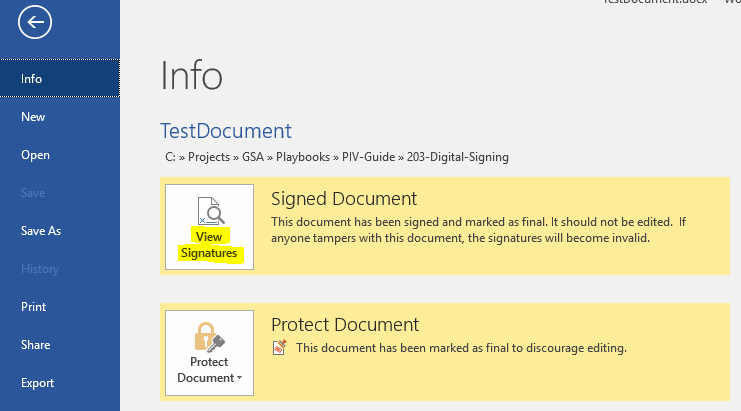
You can view digital signatures in an incompatible Word document in one of three ways:
Click the View Signatures button just below the Word ribbon.

OR
Click the File tab and select Info. Then click View Signatures.
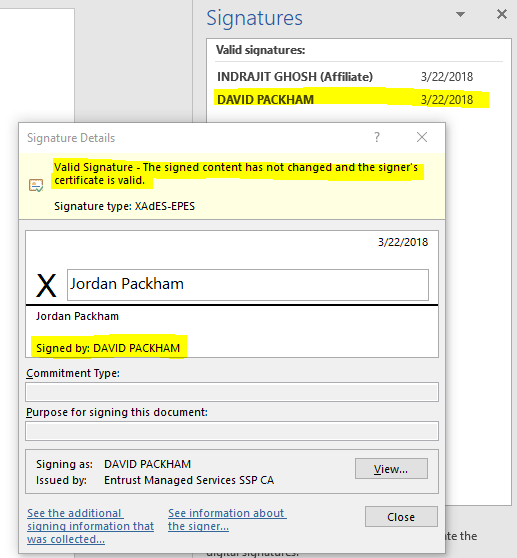
Another way to view the signatures pane is from the bottom of the Word window, it may have a small document with a certificate seal next to the word counter. If you click on this icon, the software will open the Signatures Pane where you can view all signatures and details as normal.

For any of the above options, you will be able to see the digital signature details in the Signatures pane.
Remove a Digital Signature
The ability to remove a digital signature might be necessary if last-minute document changes are needed or if a different signatory authority is desired. Remember that the document will have to be re-signed by the proper authority prior to submission to OFR.
- If you want to remove a digital signature, open your Word document and go to the signature line.
- If there is no signature line, click the View Signatures button just below the Word ribbon.
-
From the Signatures box, select the signature you want to delete.
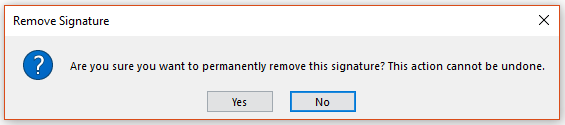
- Right-click on the signature and then click Remove Signature.
- When prompted, click Yes.
Verify Digital Signature Settings
Please ask your Technical Support staff for help. Administrator privileges are required for these steps.
By default, Microsoft Word uses the SHA-1 hash algorithm to generate digital signatures. The SHA-1 hash algorithm is no longer considered secure. More secure hash algorithms, such as SHA-256, should be used. (See NIST’s guidance on hash functions)
You can use either option below to verify/change the hash algorithm settings for Microsoft Office:
- Group Policy settings: Use Digital Signatures with Office 2016 . (For additional information, consult Microsoft’s technical documents.)
- Computer registry settings. Change the Microsoft Office signature algorithm, as follows:
Word 2010:  Computer\HKEY_CURRENT_USER\Software\Policies\Microsoft\Office\14.0\common\signatures
Word 2013:  Computer\HKEY_CURRENT_USER\Software\Policies\Microsoft\Office\15.0\common\signatures
Word 2016 (or later):  Computer\HKEY_CURRENT_USER\Software\Policies\Microsoft\Office\16.0\common\signatures
- Add or update these values:
| Value Name | signaturehashalg |
|---|---|
| Value Type | REG_SZ |
| Value | sha256 |
- Save the registry settings and restart the computer.
(For additional information, consult Microsoft’s technical documents.)
Additional Resources
- Add or Remove Digital Signature in Office Files
- Office of the Federal Register Document Drafting Handbook
- XML Digital Signature
- Digital Signatures in Office 2010
- Use Digital Signatures with Office 2016
- NIST Policy on Hash Functions
- Add or Remove a digital signature for Microsoft 365 files
OFR Submission FAQs
We’ve been using the free GSA Digital Signing Tool to sign documents. Do we need to change?
You should adopt the MS Word signing procedures sooner rather than later. The GSA Digital Signing Tool is no longer supported and may malfunction.
What files does the portal accept?
The portal accepts signed MS Word files with the “.docx” extension.
What special software do we need to buy and install to make this work?
None. As a federal agency, you should already have MS Office 2010 or later installed, or access to Office 365. Simply follow the provided instructions to digitally sign your documents.
Do you accept any MS Word file?
No. Your file must be saved as an XML-based MS Word document (“.docx”). If you’re using MS Word 2010 or later, this is generally the default setting. Otherwise, when you save the file, choose “Word Document” (.docx) in the “Save as type” pull-down.
We save everything as a “.doc” file and/or we’re still using MS Word 2007 (or earlier). What are our options?
Paper-and-disk submission. Don’t forget the CD and the signed certification letter!
All we need is MS Word 2010 or later?
Yes, that and your signing credential, either the one on your PIV card or the one your agency purchased that is currently installed on your computer.
We purchased our signing certificates from a PKI vendor. We use them to sign, which creates the “p7m” file. What do we do now?
If you are using purchased certificates, such as from a trusted PKI vendor, you can continue to use them. Instead of being on a PIV card, your certificate is installed on your computer. Follow the Add Invisible Digital Signatures in MS Word instructions above to sign your MS Word file.
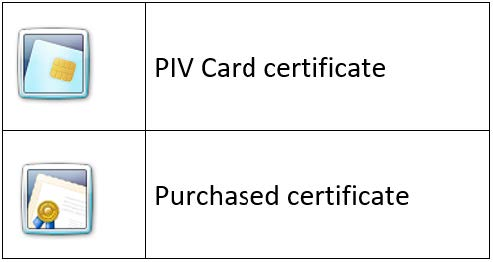
How do I identify the Purchased Certificates and PIV Card Certificates when signing a document?
When checking for the correct certificate, as detailed in Step 7 of the Add Invisible Digital Signatures in MS Word instructions above, note the different icons for the PIV and purchased certificates:
Some of our signers use MS Word for Apple on iPad. Will this work for PKI submission?
Microsoft has not put that function (PKI-based digital signature) into the MS Word for Mac (Office for Mac) software. We recognize that some agencies have signers who use the Mac platform. We expect to run testing when this function becomes available. Another alternative may be to use Office 365 via your organic browser which may be able to support digital signature.
I already have a web portal submission account. Do I need to update it or reapply?
No.